Home Theater
A home theater will bring you the most cinematic experience you can get. Most home theaters are built in a dedicated room, but they can also be incorporated into a multi-purpose space. Some theaters are grand and expensive, and others can be compact and very affordable. A theater can be designed to fit your space and budget. We’ll work our magic…you bring the popcorn!
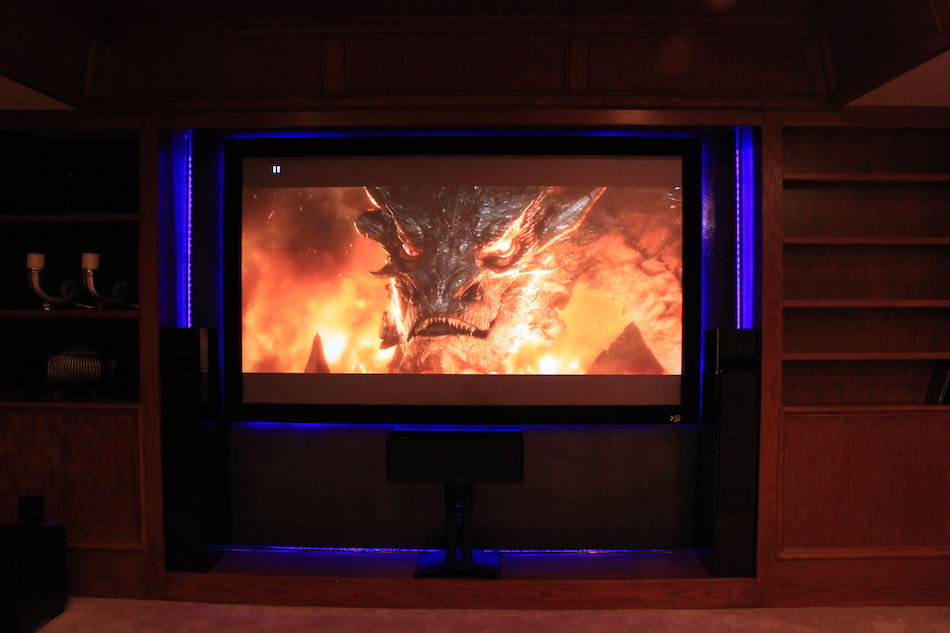
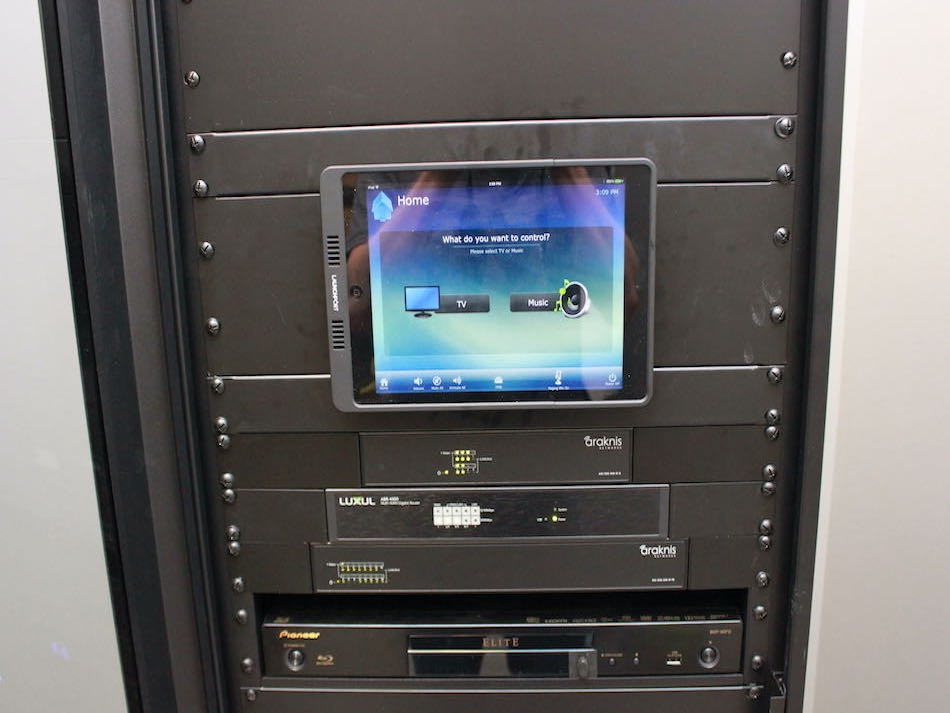
7.2.2 Dolby Atmos with Martin Logan Speakers

This particular system was a bit tricky in that the old projection screen was a 4:3 ratio (the old square kind) and the screen itself didn't even have a wall to mount on. We did not want to rip out the built-in cabinets, so we had to work within those parameters. We came up with a design to maximize the use of the space and bring this theater up to modern spec.

You can see where the old "square" screen was suspended in the empty space. After we took the screen out, we could do all of the wiring. Then we had to frame up a false wall and finish the drywall.

New JVC Pro 4K projector installed in place of the old one.

We ended up painting the new wall with an interesting black metallic paint. We wanted to try something besides plain flat black, and it worked really well. We also framed up a base to wrap with LED lights for a halo light effect.

We went with an enclosed rack to hold all of the gear: Marantz receiver, Xbox, Blu-Ray, and so on.

We went with a Black Diamond screen which gave a very impressive picture. We chose Martin Logan tower speakers that would just fit to the side of the screen. There are also two Martin Logan subs and 4 in-ceiling speakers.

The client decided to add a little icing to the cake for his new system; a custom iPad control system with RTI. The iPad mounts on the wall for convenient storage and charging, and can be removed when in use. We also added controlled lighting to the room which the iPad can function as well.

Black Diamond with Dolby Atmos
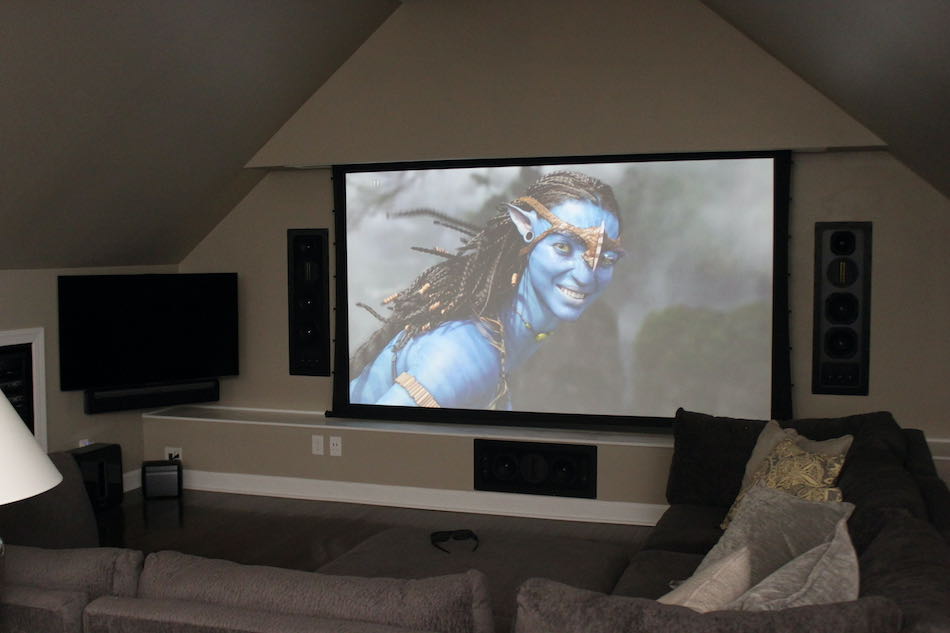
Dual Screen Theater and Recessed Rack

This theater room was built in a 3rd floor bonus room. The room was wired while it was unfinished, and the theater was installed after the builder completed the room. The client wanted a main projection screen with surround sound, and then a secondary TV with a Sonos Playbar and Sub.

There wasn’t a flat wall where we could mount a fixed screen, so we opted to do a motorized screen in front of the window. In order to conceal the screen housing, we framed and drywalled a “container” to hide the housing to achieve a finished look.

This system was going to require a lot of equipment, but there wasn’t a lot of space in the small room to put an equipment rack. We decided to take advantage of the knee wall and recess the rack.

Here is the finished rack cabinet before it was painted.

This gives you an idea of the wire management that is hidden behind the rack. A lot of time goes into keeping wires as clean and organized as possible. This is important for future service and troubleshooting.

The 2nd TV on the side wall was installed on an articulated mount so it can be positioned while in use. The client is able to have a football game on this TV while watching a movie on the big screen. Or the kids can play two different video games at the same time.

You can see how the screen housing is hidden inside the constructed enclosure. This gives the room a much cleaner look when the projector is not being used.

Dual Screen Theater
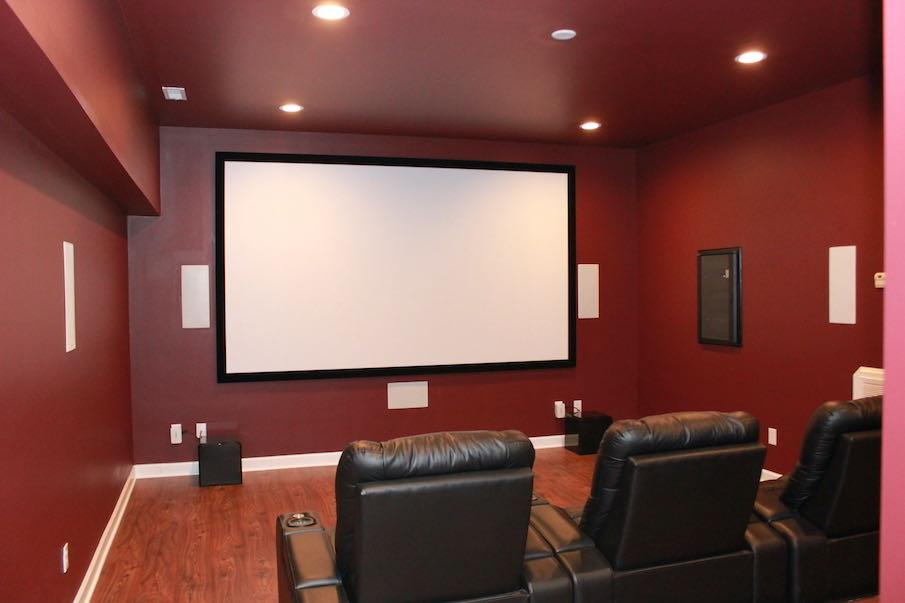
150” Screen with Wall Mounted Rack and 7.2 Speaker System

This theater was built in a large open space in a basement. Since it was a large space that opened into the rest of the basement, it had to have a great sound system; otherwise the sound would get lost in the space. The basement also has a bar, pool table, and other arcade games; so it should really be called a Man Cave!

There was a finished mechanical room on the other side of the theater wall, so we decided it would be a great place to do a recessed equipment rack. This shows the opening that we cut out and leads into the mechanical room with the support framing constructed to hold the rack.

Here is the rough fit of the rack with finish trim installed.

You can see the finished rack with tinted glass door off to the side of the main screen wall. We installed a total of 7 speakers (5 in-wall and 2 in-ceiling), plus 2-12” subwoofers to fill the space with immersive surround sound.

We also installed a 150” screen with a 4K JVC Pro projector. Another premium level theater for a great client!
150” Screen with Wall Mounted Rack
7.2.2 Dolby Atmos and Hidden Equipment Rack

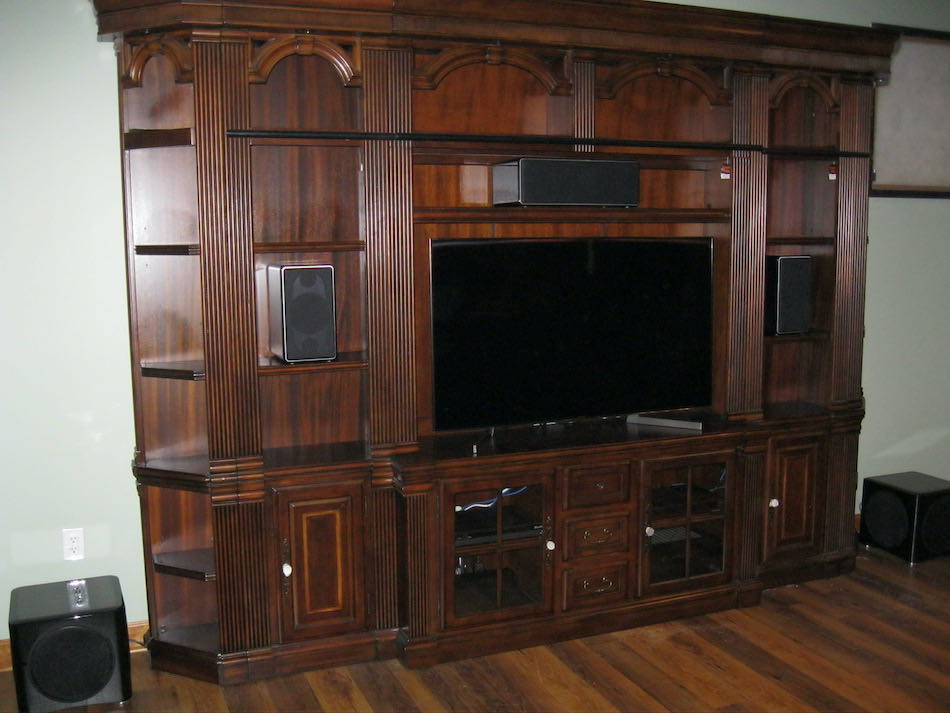
Our client purchased a home with a finished basement. There was a space that could be used as a theater room, but it was not immediately obvious how the room should be laid out. There were some existing built-in cabinets that took up an entire wall and the fate of these cabinets was an important debate.

The client decided to have the old cabinets removed and have the wall framed and drywalled. We were able to use this to our advantage and utilize the dead space behind the wall to recess an equipment rack.

We cut a hole were the rack cabinet would be built and cut another access hole to allow service entrance behind the false wall. Both of these would be covered by movie posters later. You can also see where we cut out for some of the in-ceiling speakers.

The client wanted the biggest possible screen the room would allow. We decided to go with an acoustic screen which allows the front speakers to be placed behind the screen; thereby allowing the screen to take up more of the wall. Acoustic screens also give you the best cinematic feel since that is how it is done at the movies.

Here is the completed rack cabinet that we built and painted black. This box houses the main rack which is on a slider so the equipment can be serviced after installation.

After the rack was finished, we installed a movie poster that we modified to be hinged.

You can see how the rack can slide completely out and then it will rotate to allow access to the rear of the equipment. This makes service and upgrades a breeze. You would never know that there is a rack and an access hole behind these movie posters.
The completed project includes a 4K projector, 145” acoustic screen, 9 speakers, 2 subwoofers, and a sneaky little equipment rack …plus one happy client!

Acoustic Cinema with Dolby Atmos
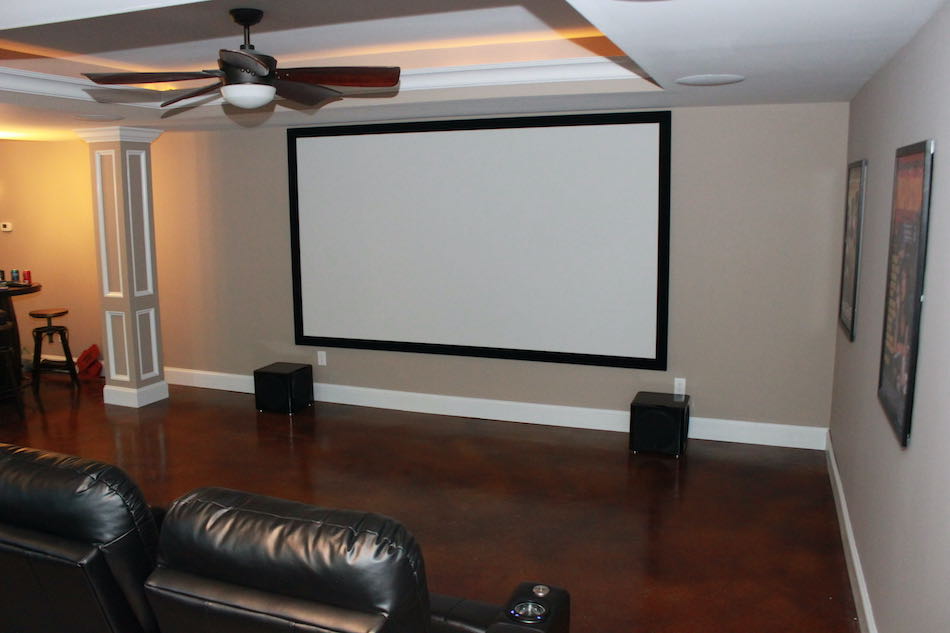
Big Screen and Big Sound for a Small Room

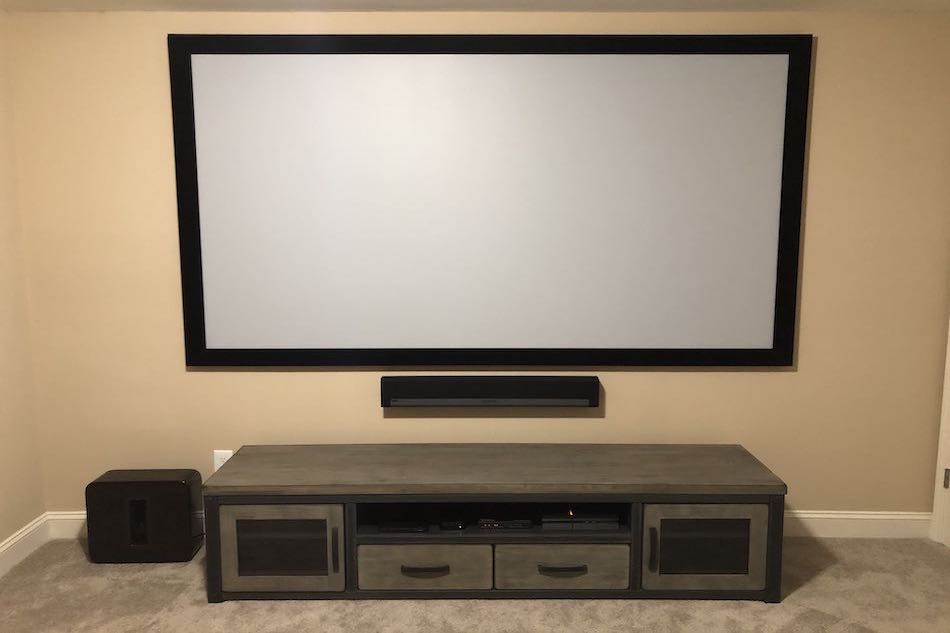
Whoever said you need a big room and an even bigger budget to have a home theater? You can create an in-your-face experience even in a small room. This client wanted to create a cozy media room for he and his wife. We were able to build the perfect system for this room on a very comfortable budget, and they love it! …she even uses it more that he does!

We decided to go with a High Contrast Grey screen to enhance the black level of the projector image. The screen was installed first so we could then run wires and install the sound bar.

The next step was to install the Sonos Playbar and run power and HDMI to the projector.

Here is the finished projector mounted with all cables neatly concealed. The nice thing about running wire during the installation is that you have a lot more control of exactly where you place wall plates. This allows the finished product to have a clean look.

The Sonos surround sound system included two Sonos One speakers mounted on stands. Together with the Playbar and Sub, this was one powerful sound system for this small room.
Small Room Theater with Sonos
TV Installations
TV installations can be as simple as mounting a small TV in a guest bedroom or as complex as a large TV with full surround sound system in a living room. Whatever your need, the finished result should look clean and professional with no wires showing. If you’ve been browsing other A/V websites, then you’ve seen plenty of generic “TV over the fireplace” pictures. Hopefully, you will find something a little more insightful here.
Samsung "Frame" TV Installation

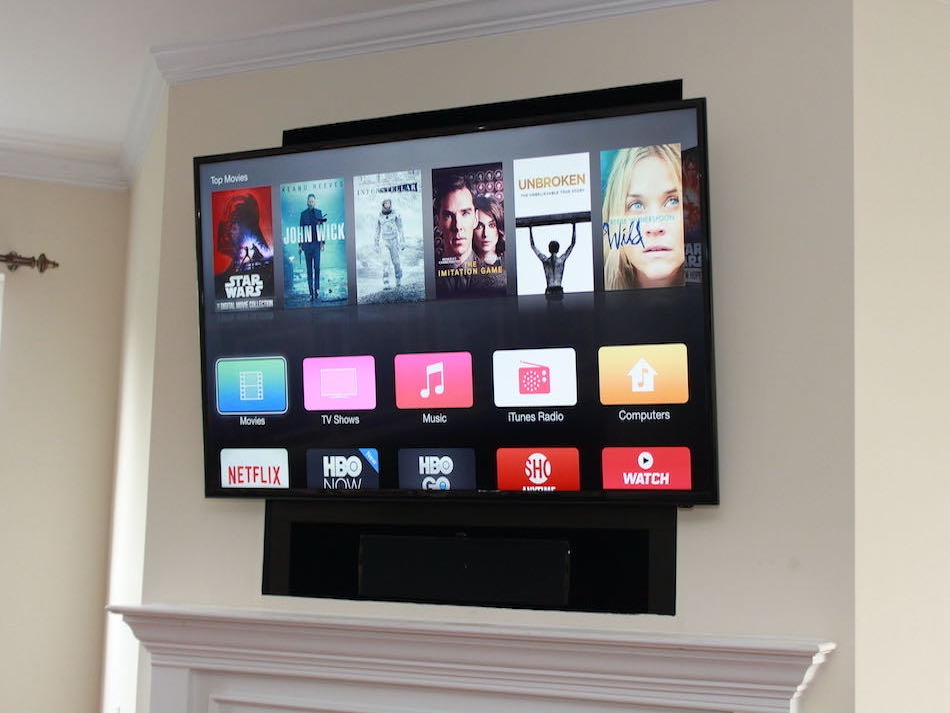
The Samsung Frame TV requires a special introduction. It is built to look like a picture frame and comes with a special wall mount to hang it really close to the wall. When the TV is "off" it displays art; which there is plenty to choose from, and you can upload your own photos. This is a solution for someone who wants the TV to "disappear" when it is not in use.

Our client recently purchased a home and inherited the old style recessed TV cubby over the fireplace.

They also inherited this….

Styling was very important to this client, so we decided to have the cubby enclosed; we ran the pre-wire after the carpenter framed it in. The space in the mantel that held the old center speaker was covered up as well.

Once the carpenter finished up, we were able to proceed with the final installation.

The source components for this job were minimal, so no need to install a rack; but it still looks way better than the nest of wires!

This TV is very convincing when in art mode. It is easy to change the art whenever you want, or display family photos.
Samsung "Frame" TV with Sonos
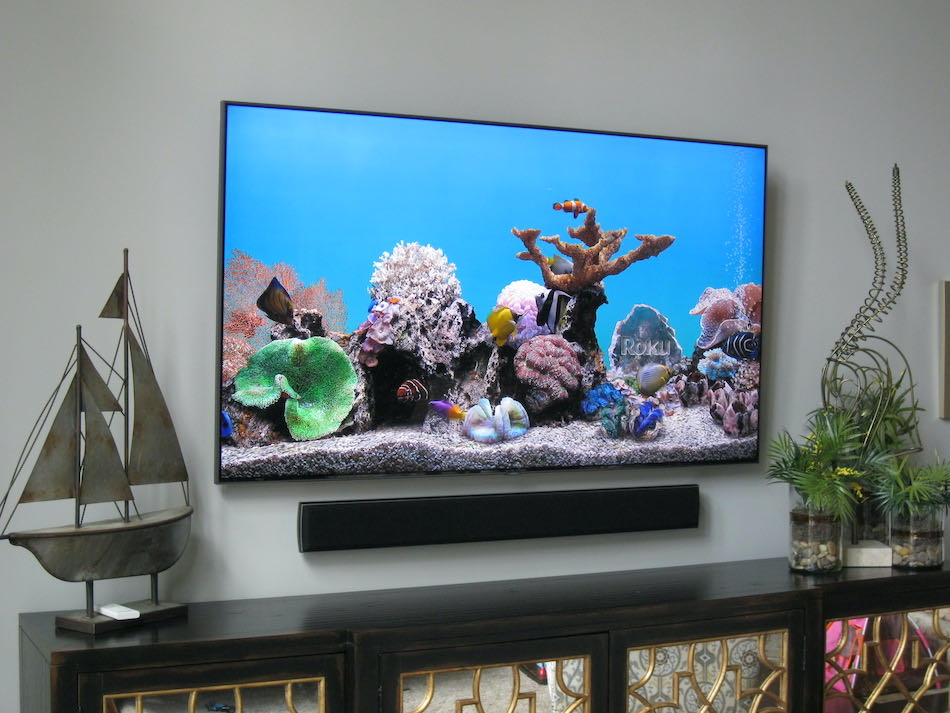
Large TV with Soundbar

This project took place in two phases. Initially, the client wanted to update their surround sound. The builder installed in-ceiling speakers for the front left, center, and right in a large room with a high vaulted ceiling. This was less than optimal placement for front speakers (and that’s putting it nicely). The first phase was dealing with the speakers; phase two included a new TV.

We decided to abandon the in-ceiling speakers and install a sleek soundbar with the TV originally installed by the builder. Using a soundbar would position the speakers in a much more ideal location.

Since we had to run new speaker wire for the soundbar, it was a good opportunity to run newer cables to the TV as well.

The new soundbar is installed and the first phase is complete. About a year later, the client was ready to get a new and bigger TV.

Even though the new TV has a larger screen, it did not have a much bigger footprint than the older style TV. This is because modern TVs have a very thin bezel giving you more screen without increasing the overall size of the TV by much. He was happy with the larger screen, and she was happy that the TV was not much bigger!
Large TV with Soundbar
Small Nook TV Installation

Here is a great example of a really basic TV installation. The client was getting moved into their new house and there was some old wiring where the previous owner had their TV mounted. This job was short and sweet; get the TV on the wall and make it look nice.

There was one small challenge with this installation; mounting the TV on the decorative trim instead of a flat wall. We needed to take into consideration how the finished TV would be framed within the trim work. You don’t want to just throw the TV on the wall and call it done. You have to take a little extra time to make sure the TV looks like it’s supposed to be there.

We had to slightly rework the old wiring. We ran an extra HDMI in case the client ever wanted to add another source device. Once the TV was on the wall it was a marked improvement.
Small Nook TV Installation
Large TV Credenza with Surround Sound

This project involved a very large TV credenza. The client’s living room had a giant blank wall, so they decided to get the credenza to fill the space. His vision was to have an amazing sound system that performed equally well for music and movies. He also wanted an additional set of speakers in the kitchen to extend the TV and music audio. The kitchen speakers can be controlled independently from the living room.

The quality of the sound system was key. Aesthetics was not a major concern, but we still wanted the speakers to fit well within the form of the credenza. We chose bookshelf speakers that would fit in the required space and still give an epic performance.

We cut out the back of the cabinet to allow better access to the back of the receiver and for better wire management.

This cabinet had plenty of space to install the equipment, so there was no need to try and cram everything into one space. Some components (not pictured here) are installed in the adjacent cabinet. We also installed a temperature controlled ventilation fan to exhaust the heat.

The sound system was finished up with in-ceiling surround speakers, 2 triple-10” 1200W powered subwoofers, and an additional pair of in-ceiling speakers in the kitchen to pipe in TV sound or music.
TV Credenza and Surround Sound
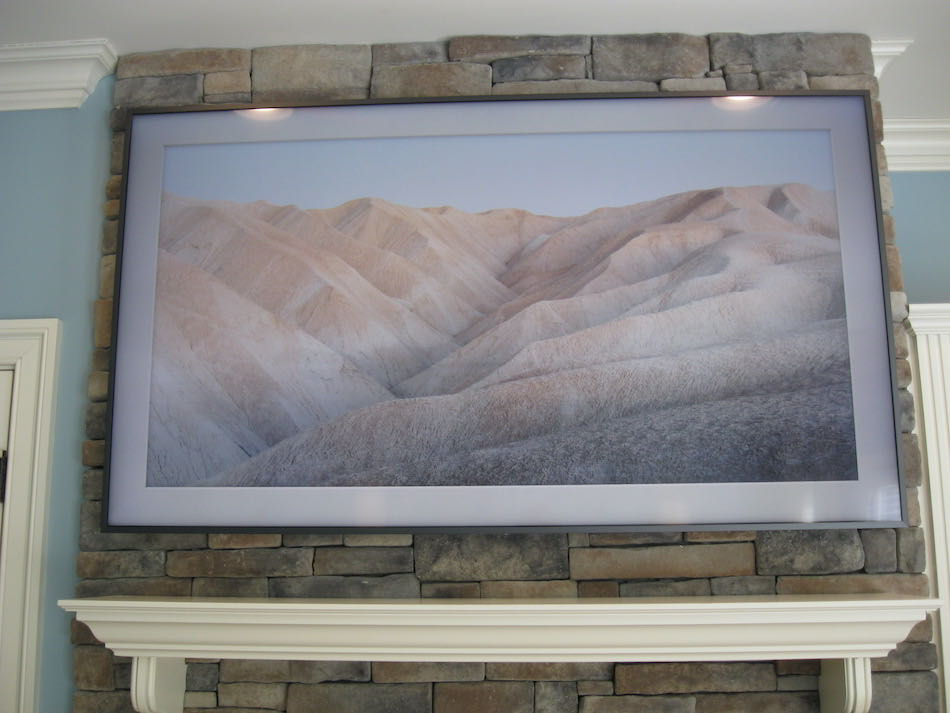
“Frame” TV on Stone Fireplace

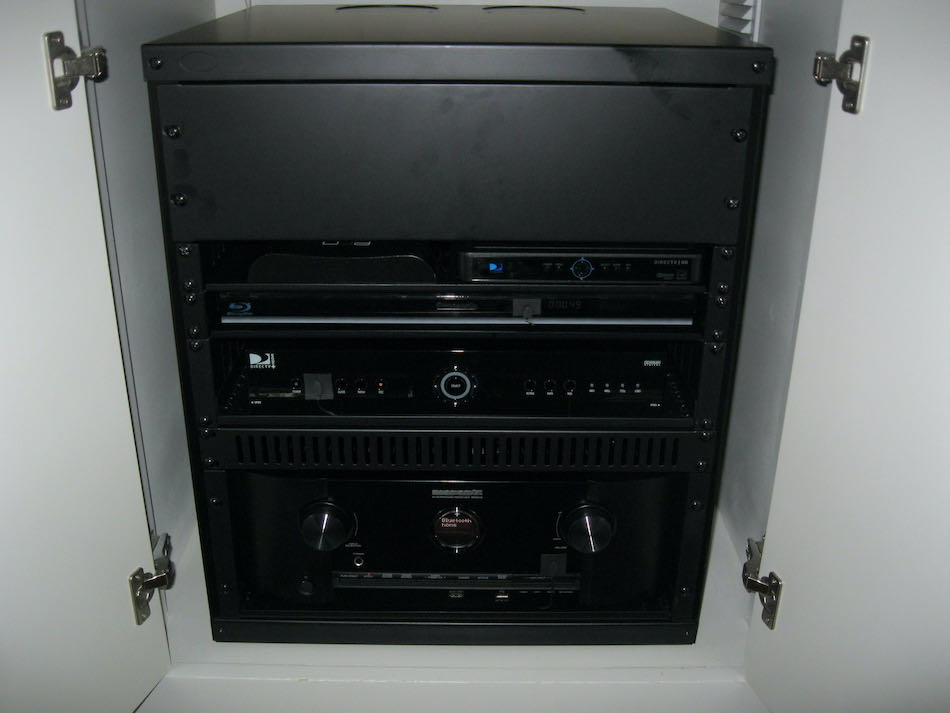
This is another example of the Samsung Frame TV. In this project we had to mount the TV on a stone veneer over the fireplace. There was also a nest of old wires and equipment in the side cabinet where the client opted to clean it up with a rack.

This cabinet wasn’t in too bad of shape (we’ve seen a lot worse). We added an equipment rack to keep things clean and hold the new equipment.

Finished equipment rack.

Mounting a TV on stone veneer is always more challenging that mounting on a flat wall. If it’s done right, a TV looks great with stone behind it.

Here is a side shot of the Frame TV to show you how tight the TV is against the wall/stone. This low-profile design helps with the clean look of the finished project.
“Frame” TV on Stone Fireplace
Slide Out Cubby TV

Ok, now this is a very interesting project! Our client bought a home with one of those old TV “cubbies” over the fireplace. In most cases, we would frame in and drywall the cubby which would give you a nice flat wall to mount a TV to. This job, however, was a little different because of what the client needed for his system. It’s safe to say that this is a unique solution to a specific problem, and it is a great example of how we can come up with “out-of-the-box” designs.

We start the project with this basic empty cubby. Our client had a very nice surround sound system with large speakers which he did not want to part with. Often times, you will go with a sleek sound bar under the TV for a minimalistic style. In this case, we had to figure out how to incorporate larger speakers and still keep a clean look.

The client also had a large surround sound receiver and other equipment that needed to be installed somewhere. Since we were on the middle floor, we could not run wire through an attic or crawl space and store the equipment in a remote location. The equipment had to be installed in the cubby, but then how do you mount a TV and how do you access the equipment behind the TV?!

We decided to install a rack in the cubby and put it on a rotating slider. We had to build a shelf to have something secure to mount the rack to. The shelf also provided the needed space below for the center speaker. Once the wires were run and the shelf was built, we painted everything black and installed the rack.

Here you can see how we mounted the TV to the rack itself. When the rack slides out, it allows you to access the front of the equipment from one side.

And you can access the back of the equipment from the other side.

The finished project includes the center speaker below the TV and the large tower speakers flanking the fireplace. When the client needs to access the equipment, he can simply pull the TV to slide out the rack. A truly unique design to solve a very specific set of problems!
Slide Out Cubby TV
Equipment Racks
Racks are a fantastic way to organize and even show off your equipment. Adding an equipment rack to your installation really takes things to a professional level. We love to use them because they give a very clean finished look, keep equipment properly spaced for ventilation, and allow easy access for future service or equipment upgrades.
Wall Mounted IT Rack for Office Building

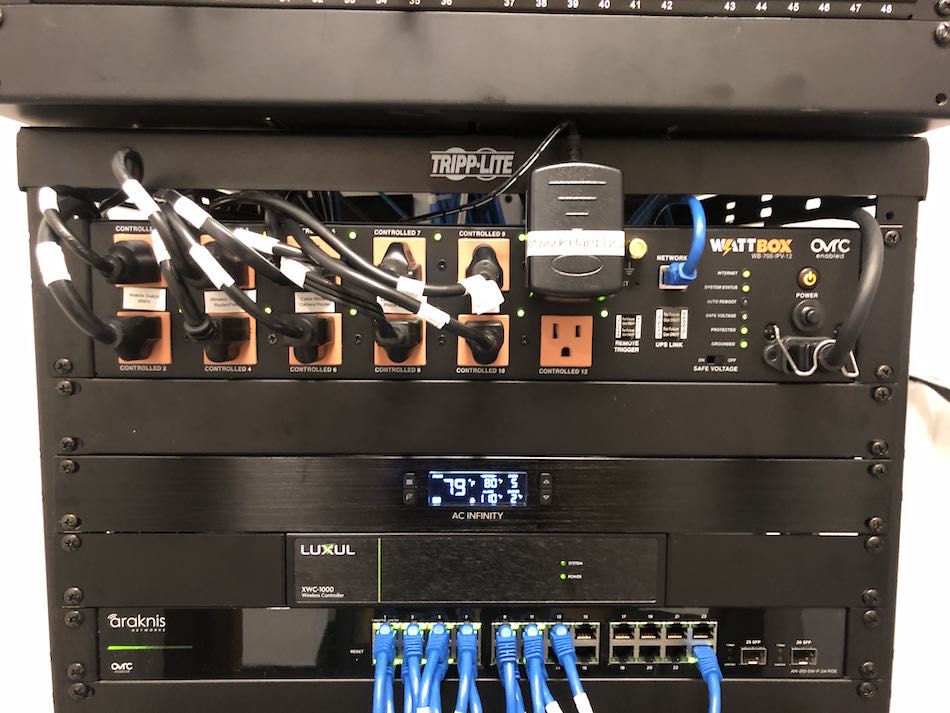
This rack was for an office that was expanding, and they needed more space added to their existing wall rack. We were also adding a new wifi system for the entire building. We needed to salvage a lot of the equipment in the existing rack since it was still in use. The condition of the existing rack had degraded over the years with so many different technicians working on it.

After adding another wall rack below the existing one, we stripped out all of the obsolete equipment and wiring. Then we added the new wifi equipment and power management. A fair amount of time was spent labeling equipment and wires so any service technicians that come in to manage their equipment will know what everything else is.

The finished rack is far cleaner and more organized despite the fact that is has more than double the original equipment. We also added a temperature-controlled ventilation fan in the closet to remove excess heat. This kind of work takes time, neatly installing one wire at a time. We think the finished result is well worth it in the end.
Wall Mounted IT Rack
Large 42-Space Rack for Brewery

We built this rack as part of a larger project for a brewery in Raleigh. The rack holds all of the equipment for the network and WiFi, multi-zone audio system, HDMI matrix, and iPad control system.

We usually start by loading in all of the equipment and then completing all internal connections between the equipment.

The next step is to add in the external wire connections. It’s important to keep all of these wires organized so the rack can still roll around freely to make is easy to service and maintain.

It’s also important to organize the equipment in a logical fashion. Grouping the audio, video, and network equipment into different sections helps make sense of a large rack like this.

Here is the finished rack with glass door and iPad mounted on the charging base. The custom iPad interface built on the RTI platform, controls all of the audio/video in the brewery. The iPad can be safely stored and charged in the rack, and then it can be disengaged from the base by the bar staff to move around the facility and control the system.
Tall Rack for Brewery
A/V Cabinet Rack

This is an example of taking the typical mess of equipment that you would find in an A/V cabinet and cleaning things up with a rack. We do a lot of these cabinet racks, usually as part of a bigger system upgrade. We can also add a rack to an existing system just to get things looking professional.

Finding this in an equipment cabinet is all too common. Built-in cabinets are just not designed to efficiently house A/V equipment.

A cabinet rack can be completely removed from the cabinet allowing full access to work with the equipment and wires. This makes service and troubleshooting far easier, and it also facilitates future system upgrades and expansion. And you can’t deny that the finished rack has a very clean and professional look to it!
Audio/Video Cabinet Rack
Outdoor Systems
It’s amazing what you can accomplish in an outdoor environment with today’s technology. The idea is to create an experience that is on par with what you would expect on the inside of your home. In other words, the system should be easy to use, provide quality performance, and aesthetically blend in with the outdoor living space. Outdoor technology can include a pair of speakers to cover a screened-in porch, a landscape audio system to cover pools and larger outdoor areas, outdoor TVs, WiFi, lighting control, and pool automation.
Outdoor TV and Rock Speakers

This client revitalized their backyard with a covered outdoor kitchen and bar area with a fire pit. They wanted to be able to listen to music at the fire pit and watch TV at the kitchen/bar. A pair of rock speakers were installed by the fire pit seating area powered by a Sonos Amp.

We installed a Sunbrite true outdoor TV on an articulated mount so the TV could be positioned based on where guests were sitting. This is controlled by a custom handheld remote that operates the TV, Roku, and Sonos.

The roof that covers the kitchen needed 4 outdoor speakers (one on each corner) to provide sufficient sound coverage without having to blast the speakers. These speakers handle the TV sound as well as Sonos music. The added bonus is the client can have a football game on the TV, and then have music playing through the speakers if the game sound is not the priority.
Outdoor TV and Rock Speakers
Outdoor TV Under Pergola

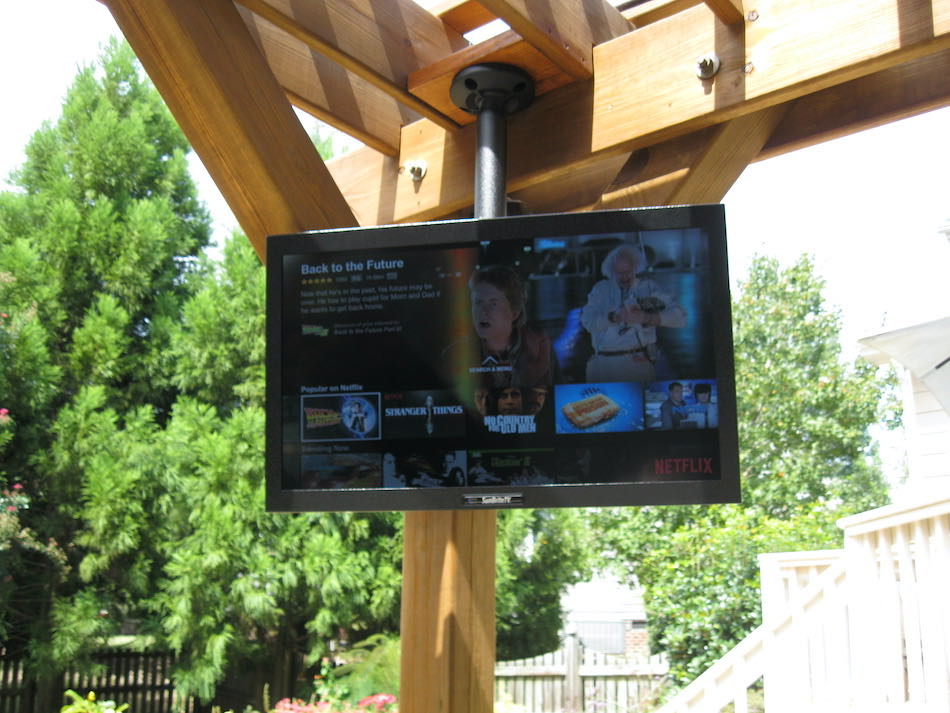
When hanging a TV in an area exposed to the elements, it is necessary to install a true outdoor TV. We installed this TV under a pergola that the client just finished building. He had a built-in grill and bar area under the pergola, and he wanted to be able to watch TV while he cooks.

Outdoor TVs have more advantages than just being weatherproof. They have brighter displays to overcome sunlight, the internal speakers are weather-proof, and they also have a weather sealed enclosure to install small equipment like a Roku or Apple TV.

Another important thing to consider is the mount itself. In this case, we used a weather rated mount that is protected against rust and uses all stainless steel hardware. You can also see how we used the down-rod of the mount to conceal the wiring, giving a clean look from the front.
Outdoor TV Under Pergola
2-Zone Outdoor Sound System

If you’re listening to music outside, wouldn’t you expect the same sound quality that you would get inside your home? That is exactly what our client wanted for their outdoor music system. The home that they recently purchase had some old Bose speakers covering the main deck, but there was a lot more outdoor space they wanted to cover.

Their upper deck was actually divided into two sections; a dining area and a sitting area. The sitting area had the old Bose speakers which they wanted to update, and the dining area had no speakers at all.

We replaced the old speakers and invested some time in cleaning up the old wiring. We also installed a second set of speakers for the dining area. Both of these connected spaces are powered by a single Sonos Amp.

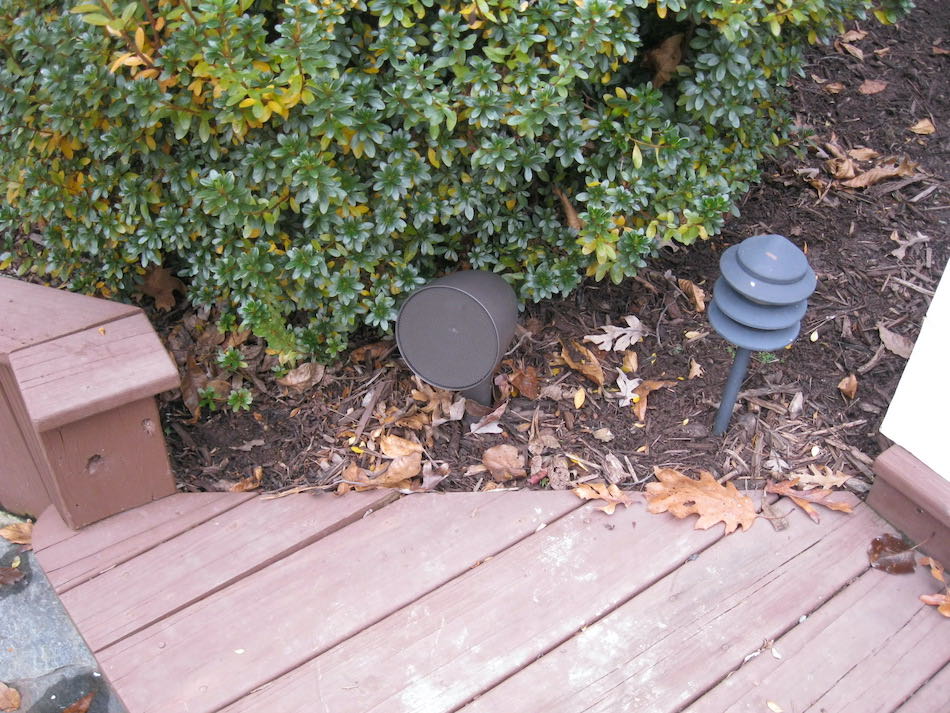
There is a patio are under the deck that comes out of the finished basement. Our client also wanted to cover this area, as well as a small portion of the back yard. We added a second Sonos Amp to power a small landscape speaker system with a buried subwoofer.

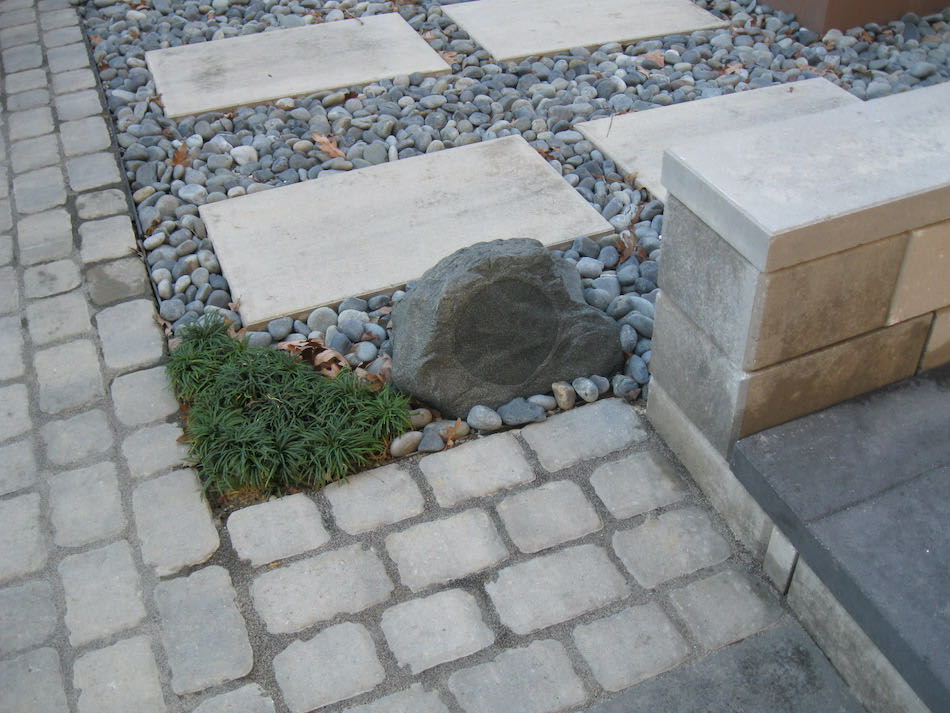
When the subwoofer is buried, you only see a “mushroom cap” that protrudes above ground. Using an outdoor subwoofer is not intended to have a college block party and irritate your neighbors; but rather fill in the bottom end of the music so you have a full and rich sound. The low end of your music suffers the most in an outdoor environment. An outdoor subwoofer will fill in that gap.

A landscape speaker system uses speakers that are a bit different from your traditional mounted outdoor speakers. The first difference is they are designed to be installed in multiple locations. In this job, we installed two speakers under the deck to cover the patio area, and two speakers in the mulch bed to cover a small part of the back yard.

Another difference with landscape systems is they are intended to have multiple speakers in order to cover a larger area. This ensures that you have an enjoyable music experience wherever you are, and the music is never too loud or too soft. We call it the “immersive music experience”. Landscape systems can also easily be scaled up, allowing you to add more speakers in the future.
2-Zone Outdoor Sound System
Surveillance Cameras
Surveillance cameras are quickly becoming a staple in residential technology. In fact, it’s one of the fastest growing segments of our business. Showcasing a camera system in a portfolio is not an easy thing to do since by their nature, camera systems are supposed to be discrete. However, most clients have never had cameras before, so we wanted to give you an idea of what a system would look like.
Large Property Camera System

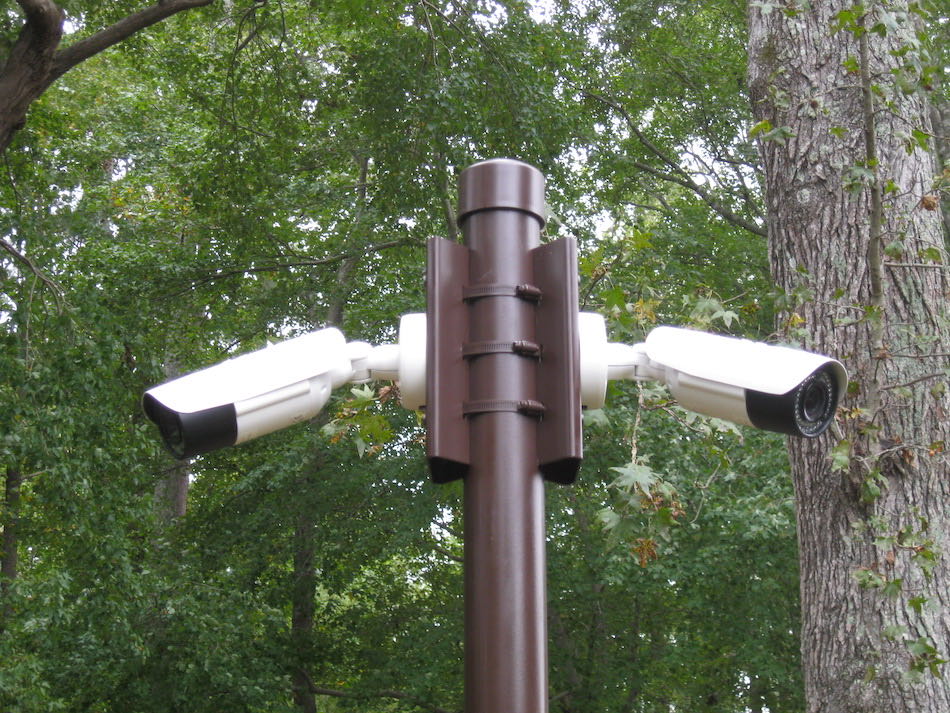
This project was quite the undertaking. My client has a 5 acre piece of land and he wanted surveillance cameras on his home and on the perimeter of the property. Cameras on the house, no problem; cameras 1000' away from the house, that's a challenge. I had to contract a company to trench conduit and power to where we would install our 12' poles to mount the cameras. I installed the poles so they knew where to run service to, and then I ran fiber optics through the underground conduit they laid. The result was 5 cameras around the perimeter, cameras on the house itself, and room to add more when my client is ready.

Here is an example of one pole prepped and ready to receiver the cameras. You can see the conduit coming out from the ground into the steel service box. It doesn't look like much, but it took a lot of work to make this happen.

The easy part was when it was time to mount the cameras! And you also keep your finger crossed that all the hard work leading up to this point was done correctly. Fortunately it was, and the cameras fired up with no issue!

This is a panel I installed in order to convert the standard Cat6 network line into fiber optic. Fiber can run a lot further than Cat6, but it is tricky to work with. Once the fiber gets to the other end, it has to be converted back to Cat6.

This is the wall mounted rack I installed to hold the camera recorder and other main components. It has a locking door (not shown). It is also hinged to swing away from the wall when service is needed.

I also installed an auto-tracking PTZ camera. This camera is able to follow a subject such as a person or vehicle once it is detected.
Large Property Camera System
9 Camera Residential System

Some clients want a couple of cameras to cover some key locations like the front and back door. Other clients want to have complete coverage around the perimeter of their home. This job required 9 cameras to achieve that goal. All of the cameras were connected to a surveillance NVR recorder. This recorder stores all captured footage on a private hard drive; not a cloud service. This also means that there are no annual or monthly subscription fees since you own the entire system.

All of our IP cameras are hard wired to the network, so there’s no need to rely on a spotty wifi connection. In most cases, we can retrofit an existing home with wired cameras.

Once the camera is installed, you are left with a clean and professional finish. We offer a variety of camera options that all come in black or white to better blend with the style of your home.
9 Camera Residential System
4 Camera Residential System

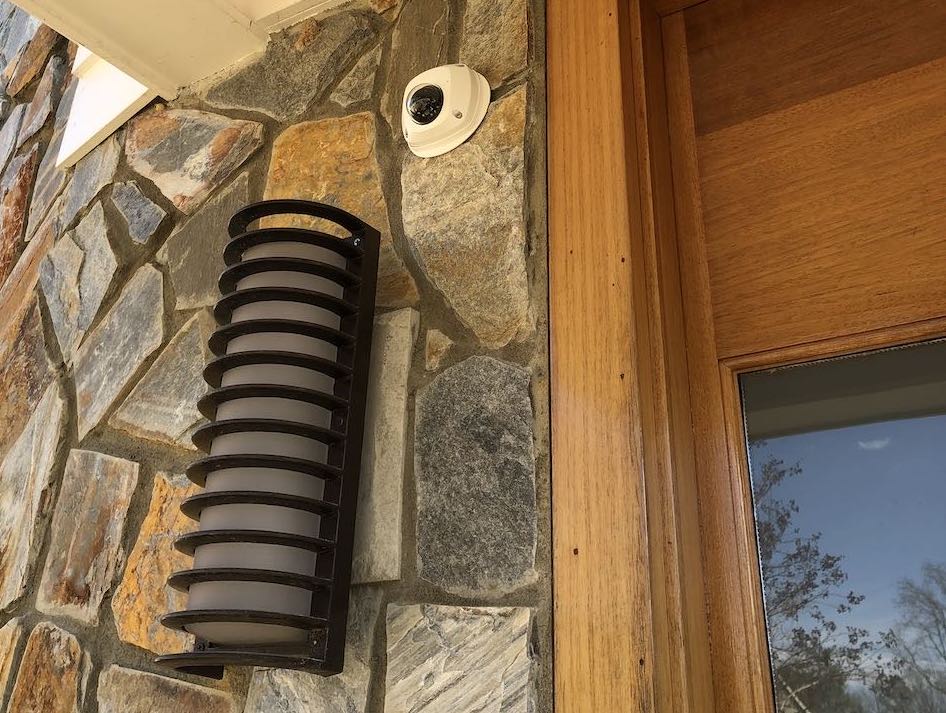
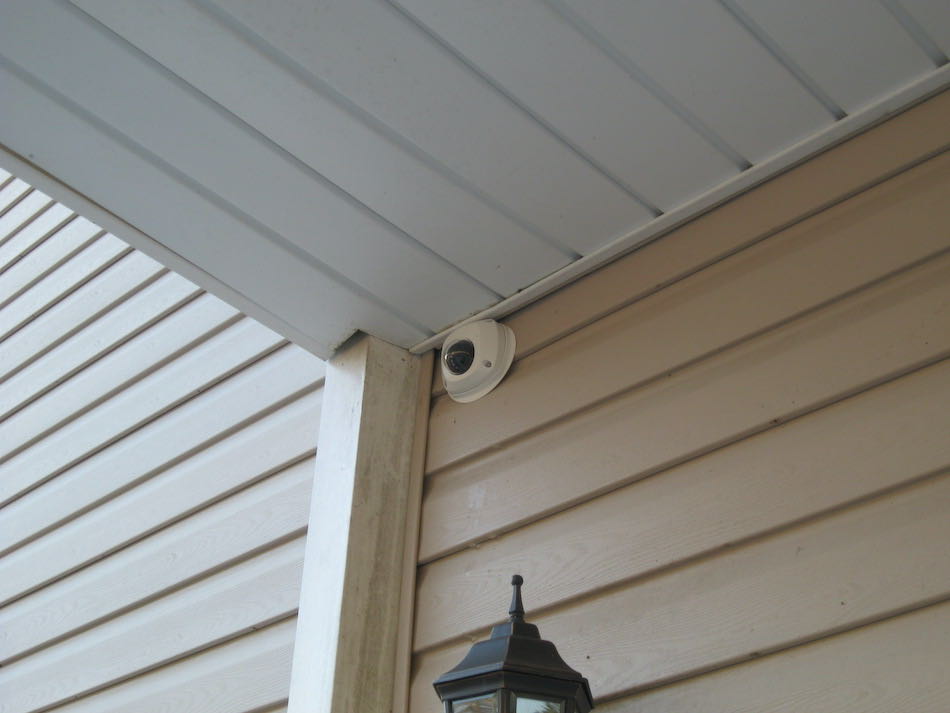
This client needed a small camera system for his home. We did 3 outdoor cameras for the front door, back door, and driveway, plus one indoor camera for the living room. We set the system up for viewing on the mobile app and gave him the ability to view the cameras on his TV.

These multipurpose indoor/outdoor IP cameras can be installed in a variety of locations. Here in the living room.

And here under a soffit.
4 Camera Residential System
Structured Wiring
Most modern homes have a structured wiring panel, and they are often in a state of disarray. The panel is the “brain” of the wired infrastructure of your home. In order to efficiently utilize that brain, the panel needs to be organized with wires properly tested and labeled, and equipment neatly installed. Here you will find examples of how we typically find these panels and how we go about turning them into an effective system for your home.
Large Mechanical Room Panel

Most structured wiring panels range from somewhat disorganized to a complete rat’s nest. This is because there is no standard on how a panel should be trimmed out. It’s also because any time a service technician (like Spectrum or AT&T) work in these panels, they do the bare minimum to complete their work. We see these panels all the time that are in such bad shape, you can’t even close the door and it has equipment hanging out of it.

As you can see, this panel is a perfect example. For this specific job, we decided to install a completely new panel that would incorporate newer and more efficient ways to install equipment. In most cases, we have to leave the existing panel and clean it up the best we can.

After the new panel and door were installed, we ran the existing wiring into the panel in an organized fashion. You can see how we mounted a network switch on the new panel door; something that couldn’t be done on the old panel. When this project was complete, all of the small equipment was neatly installed and labeled, and the unused wires were properly tucked away, awaiting future use.
Mechanical Room Panel

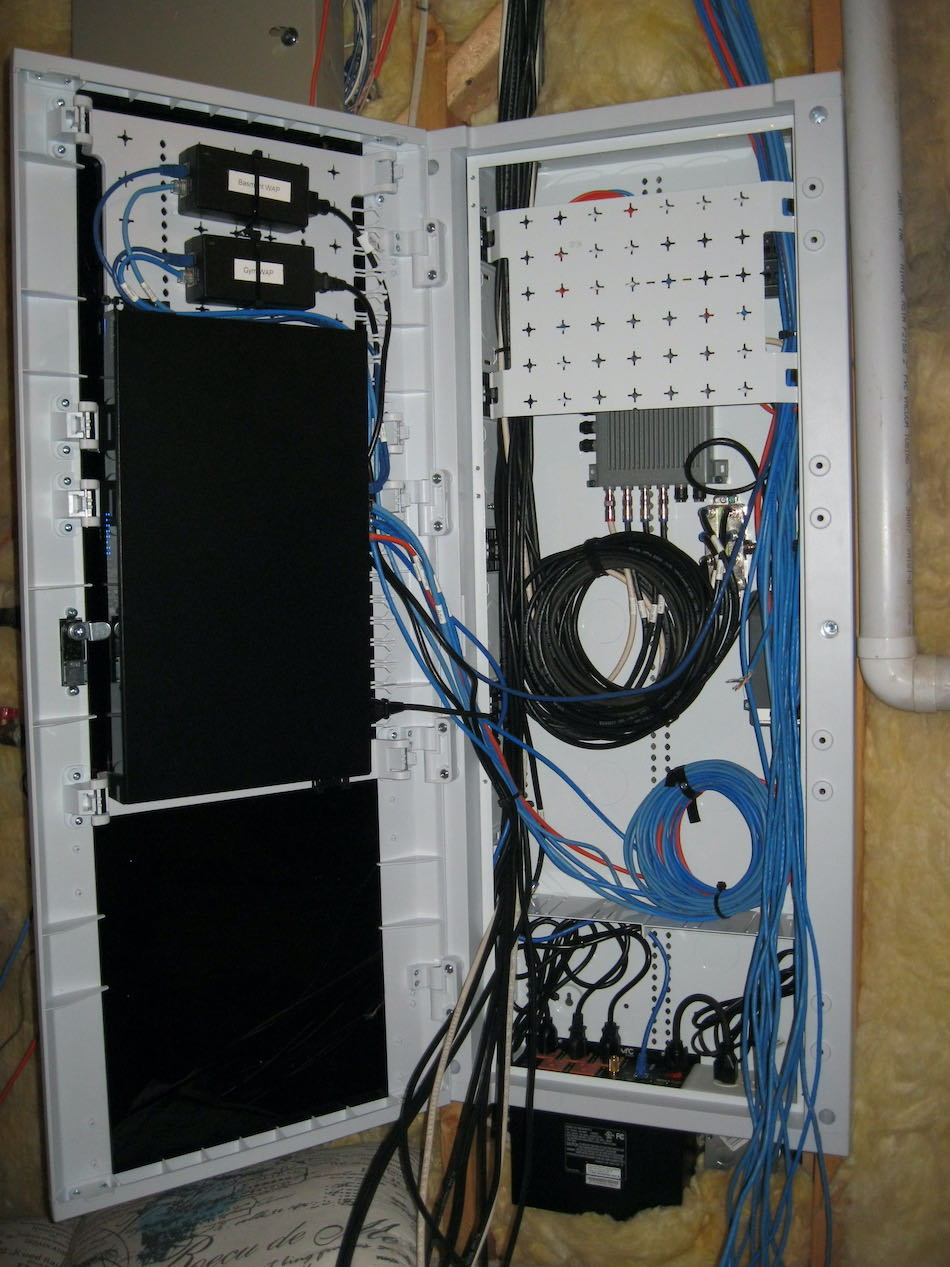
Large Closet Panel

We often say that organizing a structured wiring panel is “like trying to put a Lego set together without the instructions”. We know what the finished job should look like, and we get there by installing one piece of equipment at a time. There is also a lot of trial-and-error trying to find the best way to install everything.

This job is the quintessential example of what we often find; door off, wires hanging out, and equipment sitting on the floor. The first step is to strip out all old and obsolete equipment and wires and then evaluate what’s left over. The next step is to organize the wires coming into the panel and start installing each piece of equipment.

We decided to install the new WiFi router on the wall and no in the panel. The panel was going to be too full and the metal enclosure would have blocked WiFi signal, so an external installation was the best option. The remining equipment was installed in the panel and labeled to make future troubleshooting and maintenance much easier.
Large Closet WiFi Panel
Meduim WiFi Closet Panel

This project is an example of a panel that is actually in decent shape, but it is really isn’t being utilized. Spectrum had installed their equipment in the master bedroom because that is what was easiest for them. However, the best location for the network and WiFi equipment in this house was the panel. Relocating the equipment also got the mess out of their bedroom.

There wasn’t much to dismantle here, but we did remove the basic metal door and replaced it with a more advanced door that allows us to mount equipment to it and almost double the capacity of the panel. The new door is plastic which will not block WiFi signal and it also allows for air flow for the equipment.

The finished panel holds the modem, router, managed power supply, network switch, and POE injectors for the 2 additional wireless access points. The space in now doing what it is designed for, and the equipment is no longer an eye-sore sitting out in the open.